A slam latch is a piece of access hardware designed to ensure that doors, cabinets, or drawers are secure. These mechanical devices are spring-loaded, which means you won’t need to manually manipulate the latch to close a door or tighten an enclosure. Instead, you simply push or “slam” the door, and the latch will automatically engage.
However, if you want the hardware to function optimally, it’s important to source your components from a reputable manufacturer like Sierra Pacific Engineering and Products (SPEP). As a premier provider of industrial access hardware, SPEP offers a wide selection of slam latches and auxiliary components.
Once you find a distinguished supplier, it’s important to follow the correct installation procedures. With that in mind, check out this guide on how to install slam latches.
Understanding Slam Latches
A slam latch is a type of latch mechanism that automatically locks when you close a door or lid. This makes it ideal for applications where quick and secure closure is desired, such as toolboxes, cabinets, and access panels.
Slam latches typically consist of two main segments: the latch itself and a striker plate. When you close the door, the latch engages with the plate, holding the door in place. Slam latches offer convenience and efficiency, as you don’t have to manually secure them.
At SPEP, we offer several different variations of slam latches, including cast zinc and nylon bolt options. We also provide both locking and non-locking variants.
All of our latches feature high-end finishes, which are designed to prevent corrosion and maximize its lifespan. We provide hardware in several configurations and sizes, making them suitable for a broad range of applications.
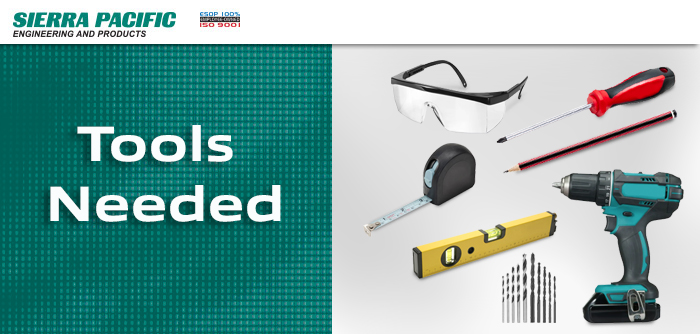
Tools and Materials Needed
Before you begin the installation process, gather the following tools and materials:
- Slam latch kit (includes latch, striker plate, and screws)
- Drill
- Drill bits
- Screwdriver
- Measuring tape
- Pencil or marker
- Safety goggles
- Level
If you order your slam latch from SPEP, it will include the striker plate and mounting hardware. The screws we provide are specifically chosen to fit your hardware, which ensures an aesthetically pleasing finish.
Preparation for Installation
Before installing the slam latch, it’s important to prepare the surface and ensure proper alignment. Begin by selecting a suitable location for the latch and striker plate, taking into account the door’s construction and the desired closing angle.
Use a measuring tape and pencil to mark the positions for drilling holes, ensuring that they are evenly spaced and aligned properly. To simplify this step, use the latch itself as a jig to mark the hole position.
Once you determine how far you want the plate to be from the edge of the door, draw a small line. Then, place the edge of the latch against the line and make a small mark inside each screw hole. When doing this, check that the mark is in the center of each hole, and then double-check your measurements as you prepare to install the hardware.
Step-by-Step Slam Latch Installation Guide
The slam latch installation process includes four simple steps, which are as follows:
Drilling Holes
Use a drill and the appropriate size to make hotels in the door and frame according to your markings. It is crucial to drill straight and make clean holes to ensure a proper fit for the latch and plate. If you drill at an angle, there’s a risk you may not have enough material for the screw to dig into.
Mounting the Latch
Next, affix the slam latch using the screws we provide. You can use a manual screwdriver or power driver to tighten the screws. If you opt to use a battery-powered or corded tool, exercise caution and do not apply too much force, or it may damage the door.
Attaching the Striker Plate
You’re ready to attach the striker plate on the frame. Again, be careful not to overtighten the screws, but verify that the hardware fits securely against the frame.
Testing the Latch
Once you’ve installed both parts, test the mechanism to assure all the elements function properly. Shut the door firmly to engage the latch with the striker plate. Next, try opening and closing the door to verify that the latch locks and releases smoothly.
Troubleshooting Common Issues
Typically, installing access hardware is quick and easy. However, if you encounter any issues during the installation or notice that the latch isn’t functioning as it should, here are some common troubleshooting tips:
- Check for proper alignment of the latch and plate
- Ensure that the screws are tightened securely
- Lubricate the latch mechanism with a silicone-based lubricant
If your latch sticks or is difficult to open, adjust the plate or latch position slightly to improve alignment. Some SPEP hardware options also include an adjustable spring. New springs may be rigid. Decreasing the tension slightly can help alleviate this.
Maintenance Tips
SPEP slam latches are built to last. With a little maintenance, you can ensure an optimal lifespan and minimal issues. We recommend that you:
- Regularly clean the latch and striker plate to remove dirt, debris, or buildup
- Inspect the mechanism for signs of wear or damage
- Lubricate the mechanism as needed
If you need replacement parts, please feel free to connect with our team. We may offer expedited shipping and keep a large inventory of hardware on hand.
Explore SPEP’s Selection of Slam Latches
With proper installation, slam latches offer a quick and secure closing mechanism for cabinets and doors. However, it’s fundamental to choose high-quality materials to ensure a smooth slam latch installation process and optimal service life.
At Sierra Pacific Engineering and Products, we provide an extensive selection of access hardware, including slam latches, mounting equipment, and much more. Our team serves clients in a broad range of industries, allowing us to help you find the ideal solution for your intended use case. Contact our team today to place your order.
Editor’s Picks

Sierra Pacific Engineering College Scholarship Program
Feb 7, 2022

What is Supply Chain Management, and Why Is It Important?
Jan 13, 2022
How To Make Threads in Solidworks: Become a Solidworks Expert
Nov 10, 2020
